Installation d'une Imprimante HP en réseau sous Linux
Voici comment installer une imprimante HP Laserjet 200 PRO sous Linux Mint. Cependant le modus operandi ne devrait pas être très différent sous une autre distribution, ou pour un autre modèle d'imprimante HP tant que HPLIP (HP Linux Imaging and Printing) peut être installé. De la même façon, une installation en connexion USB utilisera les mêmes outils, seuls les choix dans les menus différeront quelque peu.
HPLIP gére plus de 1500 modèles HP: imprimantes laser, jets d'encre, et fax (voir https://www.openprinting.org/driver/hplip/ ). Je vous déconseille donc d'installer votre imprimante HP par la méthode classique sous Linux (ex: Centre de contrôle / Imprimantes / Ajouter ...) car vous n'auriez sans doute qu'une gestion incomplète de votre matériel.
Dans les copies d'écrans textes ci-dessous, Les questions réponses sont surlignées en gras.
Pour commencer, il est préférable de mettre à jour votre système en tapant les commandes habituelles:
$ sudo apt-get update
$ sudo apt-get upgrade
Installez ensuite le paquet HPLIP:
$ sudo apt-get install hplip
Il faut maintenant installer les plugins (firmware des imprimantes ). Lancez les commandes suivantes en mode utilisateur (non root):
$ hp-plugin -i
 HP Linux Imaging and Printing System (ver. 3.17.10)
 Plugin Download and Install Utility ver. 2.1
 Copyrights ....
 (Note: Defaults for each question are maked with a '*'. Press  to accept the default.)

 | PLUG-IN INSTALLATION FOR HPLIP 3.17.10 |
 Option      Description
   ----------  --------------------------------------------------
   d           Download plug-in from HP (recommended)
   p           Specify a path to the plug-in (advanced)
   q           Quit hp-plugin (skip installation)
 Enter option (d=download*, p=specify path, q=quit) ? d

 | DOWNLOAD PLUGIN |
 Checking for network connection…
 Downloading plug-in from:
 Downloading plug-in: [] 0% Receiving digital keys:
/usr/bin/gpg --homedir /home/user/.hplip/.gnupg --no-permission-warning
--keyserver pgp.mit.edu --recv-keys 0x4ABA2F66DBD5A95894910E0673D770CDA59047B9

 | INSTALLING PLUG-IN |
 Creating directory plugin_tmp
 Verifying archive integrity… All good.
 Uncompressing HPLIP 3.17.10 Plugin Self Extracting Archive…………………………………………

Do you accept the license terms for the plug-in (y=yes*, n=no, q=quit) ? y
 Please enter the sudoer (user)'s password:
 Done.
 Done.
A ce stade, nous allons détecter l'imprimante réseau. Celle-ci doit être allumée ;=). Je vous conseille également de désactiver temporairement votre pare-feu (ex: sudo ufw disable )
$ hp-probe
 HP Linux Imaging and Printing System (ver. 3.17.10)
 Printer Discovery Utility ver. 4.1
 Copyright (c) ...
 | SELECT CONNECTION (I/O) TYPE |
 Num       Connection  Description
             Type
----------------------------------------------------------
   0*        usb         Universal Serial Bus (USB)
   1         net         Network/Ethernet/Wireless (direct connection or JetDirect)
   2         par         Parallel Port (LPT:)
 Enter number 0…2 for connection type (q=quit, enter=usb*) ? 1
 Using connection type: net
 | DEVICE DISCOVERY |
 Probing network for printers. Please wait, this will take approx. 10 seconds…
 Device URI                                               Model                            Name
   -------------------------------------------------------
   hp:/net/HP_LaserJet_200_colorMFP_M276nw?ip=192.168.0.XX  HP_LaserJet_200_colorMFP_M276nw  NPI6BEABC
 Found 1 printer(s) on the 'net' bus.
 Done
Tout se passe bien puisque l'imprimante est détectée. Dans le cas contraire faites les vérifications d'usage:
- imprimante allumée
- pare-feu désactivé (Attention le pare-feu tout ouvert en sortie peut ne pas suffire ...)
- interfaces dans le même sous-réseau TCP/IP
- interface réseau de l'imprimante active et configurée
- réseau fonctionnel (ping imprimante ...)
- la désactivation de certains protocoles (bonjour, snmp, WS, ...) peut empécher la bonne détection de l'imprimante
- ... et relancez hpprobe
Procédons à l'installation proprement dite:
 $ hp-setup -i
 HP Linux Imaging and Printing System (ver. 3.17.10)
 Printer/Fax Setup Utility ver. 9.0
 Copyright (c) 2001-15 HP Development Company, LP
 This software comes with ABSOLUTELY NO WARRANTY.
 This is free software, and you are welcome to distribute it
 under certain conditions. See COPYING file for more details.
 (Note: Defaults for each question are maked with a '*'. Press  to accept the default.)

 | SELECT CONNECTION (I/O) TYPE |
 Num       Connection  Description
             Type
----------------------------------------------------------
   0*        usb         Universal Serial Bus (USB)
   1         net         Network/Ethernet/Wireless (direct connection or JetDirect)
   2         par         Parallel Port (LPT:)
 Enter number 0…2 for connection type (q=quit, enter=usb*) ? 1
 Using connection type: net
 Setting up device: hp:/net/HP_LaserJet_200_colorMFP_M276nw?ip=192.168.0.XX

 | PRINT QUEUE SETUP |
 Please enter a name for this print queue
(m=use model name:'HP_LaserJet_200_colorMFP_M276nw'*, q=quit) ?HP_LJ_200_pro
 Using queue name: HP_LJ_200_pro
 Locating PPD file… Please wait.
 Found PPD file: hplip:0/ppd/hplip/HP/hp-laserjet_200_colormfp_m276-ps.ppd
 Description:
 Note: The model number may vary slightly from the actual model number on the device.
 Does this PPD file appear to be the correct one (y=yes*, n=no, q=quit) ? y
 Enter a location description for this printer (q=quit) ?
 Enter additonal information or notes for this printer (q=quit) ?
 Adding print queue to CUPS:
 Device URI: hp:/net/HP_LaserJet_200_colorMFP_M276nw?ip=192.168.0.XX
 Queue name: HP_LJ_200_pro
 PPD file: hplip:0/ppd/hplip/HP/hp-laserjet_200_colormfp_m276-ps.ppd
 Location:
 Information:

 | FAX QUEUE SETUP |
 Please enter a name for this fax queue
(m=use model name:'HP_LaserJet_200_colorMFP_M276nw_fax'*, q=quit) ?HP_LJ_200_pro_fax
 Using queue name: HP_LJ_200_pro_fax
 Enter a location description for this printer (q=quit) ?
 Enter additonal information or notes for this printer (q=quit) ?
 Adding fax queue to CUPS:
 Device URI: hpfax:/net/HP_LaserJet_200_colorMFP_M276nw?ip=192.168.0.XX
 Queue name: HP_LJ_200_pro_fax
 PPD file: /usr/share/ppd/hplip/HP/HP-Fax2-hpcups.ppd.gz
 Location:
 Information:

 | FAX HEADER SETUP |
 Would you like to perform fax header setup (y=yes*, n=no, q=quit) ?n

 | PRINTER TEST PAGE |
 Would you like to print a test page (y=yes*, n=no, q=quit) ? y
 Done.
La dernière question doit vous permettre d'imprimer une magnifique page de test, pour peu que vous ayez mis de la bonne volonté et du papier dans le bac à feuilles !
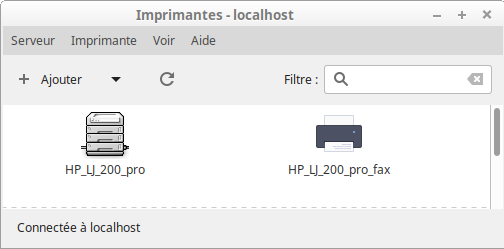
Vous retrouverez évidemment votre imprimante/Fax/Scanner dans le gestionnaire d'impression (ex: Centre de contrôle / Imprimantes) pour gérer votre file d'impression graphiquement

Enfin, n'oubliez pas de réactiver votre pare-feu (ex: sudo ufw enable).
Voilà pour ce tuto. Avant installation je craignais une gestion limitée de mon matériel, par rapport à une gestion sous Windows, mais il n'en est rien. Mon imprimante HP Laserjet 200 pro est parfaitement bien gérée sous Linux par HPLIP, jugez vous même:
- Impression réseau (ou USB, comme il vous plaira)
- impression NB / Couleur (pas mal ;=))
- partage d'imprimante
- gestion du contrôle d’accès
- gestion des numérisations réseau avec 'Simple Scan'
- récupération des numérisations sur partage réseau SMB
- ...
